1. 环境准备
下载vagrant和virtualbox,并安装
虚拟机配置
1台master:内存1024MB
2台slave:内存512MB
2. 使用vagrant部署虚拟机
安装后vagrant,需提前安装vagrant-hostmanager插件,以便host管理
1 vagrant plugin install vagrant-hostmanager
从vagrant官网下载ubuntu 16镜像:
1 vagrant box add ubuntu/xenial64
也可以使用其他镜像,镜像地址:https://app.vagrantup.com/boxes/search
创建hadoopProject文件夹(可自定),并创建两个文件Vagrantfile和init.sh
VagrantFile是vagrant的启动配置文件 ,
init.sh是初始环境的安装脚本
编辑VagrantFile文件, 内容如下:
1
2
3
4
5
6
7
8
9
10
11
12
13
14
15
16
17
18
19
20
21
22
23
24
25
26
27
28
29
30
31
32
33
Vagrant .configure("2" ) do |config | config.vm.define :master1 , primary: true do |master | master.vm.provider "virtualbox" do |v | v.customize ["modifyvm" , :id , "--name" , "hadoop-master1" , "--memory" , "1024" ] end master.vm.box = "ubuntu/xenial64" master.vm.hostname = "hadoop-master1" master.vm.network :private_network , ip: "192.168.10.10" master.vm.network "forwarded_port" , guest: 22 , host: 2222 , id: "ssh" , disabled: "true" master.vm.network "forwarded_port" , guest: 22 , host: 2220 end (1 ..2 ).each do |i | config.vm.define "slave#{i} " do |node | node.vm.box = "ubuntu/xenial64" node.vm.hostname = "hadoop-slave#{i} " node.vm.network :private_network , ip: "192.168.10.1#{i} " node.vm.network "forwarded_port" , guest: 22 , host: 2222 , id: "ssh" , disabled: "true" node.vm.network "forwarded_port" , guest: 22 , host: "222#{i} " node.vm.provider "virtualbox" do |vb | vb.memory = "512" end end end config.hostmanager.enabled = true config.hostmanager.manage_host = true config.hostmanager.manage_guest = true config.vm.provision "shell" , path: "init.sh" , privileged: false end
从代码可以看到, 我们一共创建了3个虚拟机环境 ,分别是master1, slave1,
slave2。并分配好IP地址和内存空间。
注意:在解决多个SSH端口时,需要先禁用默认的ssh转发,再添加自定义转发,才能生效。
在当前目录启动vagrant,会自动依照Vagrantfile配置文件创建虚拟机并配置。
启动过程中如果有打印如下信息,
一般稍等即可,出错可在VirtulaBox中删除虚拟机及文件重试。
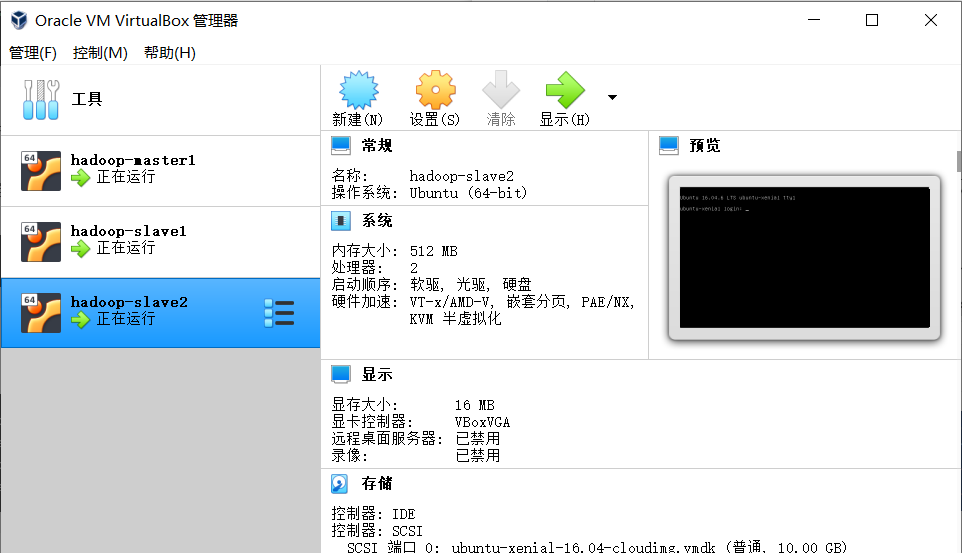
正常启动后,我们就可以在virtualBox中看到创建的虚拟机。
正常启动后,我们就可以使用以下命令登录到虚拟机:
可以直接按照host名字Ping操作:
注意:此时默认用户名和密码都是vagrant
此时,主机仅允许公钥私钥配对SSH链接,建议打开密码认证访问,编辑文件/etc/ssh/sshd_config,修改如下配置为yes:
1 PasswordAuthentication yes
重启ssh服务
1 sudo service ssh restart
编写provision文件
前面安装vagrant的时候说到,provision的作用是帮助我们进行主机环境的初始化工作,现在我们来编写init.sh,具体内容根据实际情况进行删减。在provision里,我只是安装了linux环境必需的一些组件。
1
2
3
sudo apt update # 更新apt sudo apt install openssh-server # 安装SSH sudo apt install openjdk-8-jdk # 安装JAVA
即使因为网络问题导致安装不成功,也可以手动逐个安装。
编写完后,运行命令进行生效
3. 配置Hadoop
现在我们有三台机器:
1
2
3
hadoop-master1 192.168.10.10 hadoop-slave1 192.168.10.11 hadoop-slave2 192.168.10.12
Hadoop 集群配置过程:
选定一台机器作为
Master,在所有主机上配置网络映射; 在 Master 主机上配置hadoop用户、安装SSH
server、安装Java环境; 在 Master 主机上安装Hadoop,并完成配置; 在其他主机上配置hadoop用户、安装SSH
server、安装Java环境; 将 Master 主机上的Hadoop目录复制到其他主机上; 开启、使用 Hadoop。
配置基础环境和SSH互信
所有主机配置hadoop用户、安装SSH
server、安装Java环境(前步已执行成功的可以跳过):
1
2
3
sudo useradd -m hadoop -s /bin/bash # 创建hadoop用户 sudo passwd hadoop # 修改hadoop用户密码 sudo adduser hadoop sudo # 增加hadoop管理员权限
注销并使用 Hadoop 用户登录
1
2
3
sudo apt update # 更新apt sudo apt install openssh-server # 安装SSH sudo apt install openjdk-8-jdk # 安装JAVA
设置JAVA_HOME环境变量
1
2
3
sudo nano ~/.bashrc # 最后面加上 export JAVA_HOME=/usr/lib/jvm/java-8-openjdk-amd64
使 JAVA_HOME 变量生效:
1 source ~/.bashrc # 使变量设置生效
在 Master 主机上执行:
1
2
3
4
5
6
7
cd ~/ mkdir .ssh cd ~/.ssh ssh-keygen -t rsa # 一直按回车就可以 cat id_rsa.pub >> authorized_keys scp ~/.ssh/id_rsa.pub hadoop@hadoop-slave1:/home/hadoop/ # 传输公钥到slave1 scp ~/.ssh/id_rsa.pub hadoop@hadoop-slave2:/home/hadoop/ # 传输公钥到slave2
接着在 slave1 节点和slave2节点上保存公钥
1
2
3
cd ~/ mkdir .ssh cat ~/id_rsa.pub >> ~/.ssh/authorized_keys
如果master主机和slave01、slave02主机的用户名一样,那么在master主机上直接执行如下测试命令,即可让master主机免密码登录slave01、slave02主机。
安装Hadoop
先在master主机上做安装Hadoop,暂时不需要在slave1,slave2主机上安装Hadoop。稍后会把master配置好的Hadoop发送给slave1,slave2。
在master主机执行如下操作:
1
2
3
4
tar -zxf ~/hadoop-2.7.7.tar.gz -C /usr/local # 解压到/usr/local中 cd /usr/local/ sudo mv ./hadoop-2.7.7/ ./hadoop # 将文件夹名改为hadoop sudo chown -R hadoop ./hadoop # 修改文件权限
编辑~/.bashrc文件,末尾添加如下内容:
1
2
export HADOOP_HOME=/usr/local/hadoop export PATH=$PATH:$HADOOP_HOME/bin:$HADOOP_HOME/sbin
接着让环境变量生效,执行如下代码:
Hadoop集群配置
修改master主机修改Hadoop如下配置文件,这些配置文件都位于/usr/local/hadoop/etc/hadoop目录下。
修改slaves文件,把DataNode的主机名写入该文件,每行一个。
这里让hadoop-master1节点主机仅作为NameNode使用(不包含在slaves文件中)。
1
2
hadoop-slave1 hadoop-slave2
修改core-site.xml
1 2 3 4 5 6 7 8 9 10 11 <configuration > <property > <name > hadoop.tmp.dir</name > <value > /usr/local/hadoop/tmp</value > <description > Abase for other temporary directories.</description > </property > <property > <name > fs.defaultFS</name > <value > hdfs://hadoop-master1:9000</value > </property > </configuration >
修改hdfs-site.xml:
1 2 3 4 5 6 <configuration > <property > <name > dfs.replication</name > <value > 3</value > </property > </configuration >
修改mapred-site.xml(复制并修改文件名mapred-site.xml.template)
1 cp mapred-site.xml.template mapred-site.xml
1 2 3 4 5 6 <configuration > <property > <name > mapreduce.framework.name</name > <value > yarn</value > </property > </configuration >
修改yarn-site.xml
1 2 3 4 5 6 7 8 9 10 11 <configuration > <property > <name > yarn.nodemanager.aux-services</name > <value > mapreduce_shuffle</value > </property > <property > <name > yarn.resourcemanager.hostname</name > <value > hadoop-master1</value > </property > </configuration >
配置好后,将 master 上的 /usr/local/Hadoop
文件夹复制到各个节点上。之前有跑过伪分布式模式,建议在切换到集群模式前先删除之前的临时文件。在
master 节点主机上执行:
1
2
3
4
5
6
7
cd /usr/local/ rm -rf /usr/local/hadoop/tmp # 删除临时文件 rm -rf /usr/local/hadoop/logs/* # 删除日志文件 tar -zcf ~/hadoop.master.tar.gz ./hadoop # 打包hadoop cd ~ scp ./hadoop.master.tar.gz hadoop-slave1:/home/hadoop scp ./hadoop.master.tar.gz hadoop-slave2:/home/hadoop
在hadoop-slave1,hadoop-slave2节点上执行:
1
2
3
sudo rm -rf /usr/local/hadoop/ sudo tar -zxf ~/hadoop.master.tar.gz -C /usr/local sudo chown -R hadoop /usr/local/hadoop
启动hadoop集群
在hadoop-master1主机上执行如下命令:
1
2
/usr/local/hadoop/bin/hdfs namenode -format /usr/local/hadoop/sbin/start-all.sh
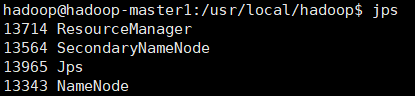
运行后,在hadoop-master1,hadoop-slave1,hadoop-slave2运行jps命令,查看:
hadoop-master1运行jps后,如下图(必须有四个进程):
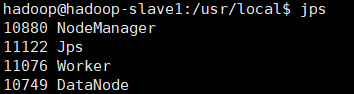
hadoop-slave1、hadoop-slave2运行jps后,如下图(必须有三个进程):
4. 在Hadoop上配置Spark
下载Spark
访问Spark官方下载地址 ,按照如下图下载(不带Hadoop版本)。
下载后,文件移到master虚拟机中,执行解压
1
2
3
4
5
cd ~ sudo tar -zxf spark-2.4.5-bin-without-hadoop.tgz -C /usr/local/ cd /usr/local/ sudo mv ./spark-2.4.5-bin-without-hadoop/ ./spark sudo chown -R hadoop ./spark
配置环境变量
在hadoop-master1节点主机的终端中执行如下命令:
在~/.bashrc添加如下配置:
1
2
export SPARK_HOME=/usr/local/sparkexport PATH=$PATH :$SPARK_HOME /bin:$SPARK_HOME /sbin
执行如下命令使得配置立即生效:
Spark配置
在Master节点主机上进行如下操作:
1
2
cd /usr/local/spark/cp ./conf/slaves.template ./conf/slaves
slaves文件设置Worker节点。编辑slaves内容,把默认内容localhost替换成slave节点:
1
2
hadoop-slave1 hadoop-slave2
1 cp ./conf/spark-env.sh.template ./conf/spark-env.sh
添加如下内容:
1
2
3
export SPARK_DIST_CLASSPATH=$(/usr/local/hadoop/bin/hadoop classpath) export HADOOP_CONF_DIR=/usr/local/hadoop/etc/hadoop export SPARK_MASTER_IP=hadoop-master1
SPARK_MASTER_IP 指定 Spark 集群 Master 节点的 IP 地址或主机名。
配置好后,将Master主机上的/usr/local/spark文件夹复制到各个节点上。在Master主机上执行如下命令:
1
2
3
4
5
cd /usr/local/ tar -zcf ~/spark.master.tar.gz ./spark # 打包spark cd ~ scp ./spark.master.tar.gz hadoop-slave1:/home/hadoop scp ./spark.master.tar.gz hadoop-slave2:/home/hadoop
在hadoop-slave1,hadoop-slave2节点上执行:
1
2
3
sudo rm -rf /usr/local/spark/ sudo tar -zxf ~/spark.master.tar.gz -C /usr/local sudo chown -R hadoop /usr/local/spark
注意: 由于我们使用vagrant-hostmanager插件,其会对本地hosts文件修改,导致主机名(host)直接与127.0.1.1绑定,若直接启动Spark
master节点,会导致只在127.0.1.1提供服务,其他局域网内slave节点无法访问,因此需要编辑/etc/hosts文件,注释掉:
1 # 127.0.1.1 hadoop-master1 hadoop-master1
启动Spark集群
启动Spark集群前,要先启动Hadoop集群 。在Master节点主机上运行如下命令:
1 /usr/local/hadoop/sbin/start-all.sh
启动Master节点 ,
在Master节点主机上运行如下命令:
1 /usr/local/spark/sbin/start-master.sh
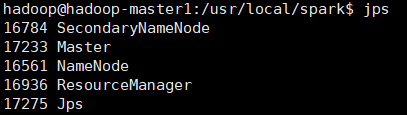
在hadoop-master1节点上运行jps命令,可以看到多了Master进程:
启动所有Slave节点 ,在Master节点主机上运行如下命令:
1 /usr/local/spark/sbin/start-slaves.sh
分别在hadoop-slave1、hadoop-slave2节点上运行jps命令,可以看到多了Worker进程:
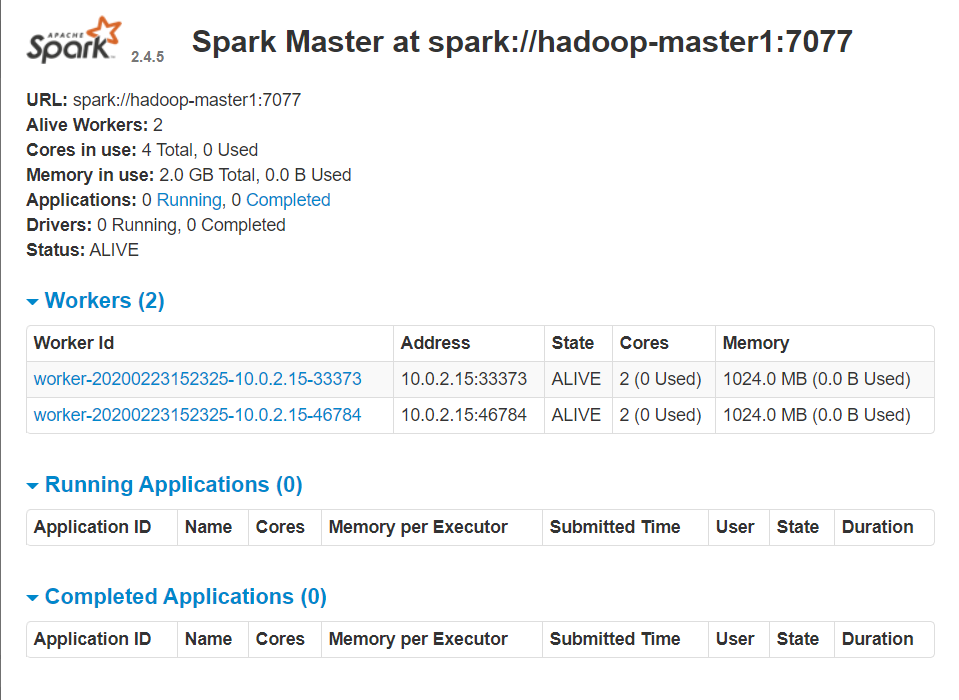
在浏览器上查看Spark独立集群管理器的集群信息
spark集群端口:8080
spark-job监控端口:4040
namenode管理端口:50070
yarn端口:8088
在master主机上打开浏览器,访问http://hadoop-master1:8080/,如下图:
关闭Spark集群
关闭Master节点
1 /usr/local/spark/sbin/stop-master.sh
关闭Worker节点
1 /usr/local/spark/sbin/stop-slaves.sh
关闭Hadoop集群
1 /usr/local/hadoop/sbin/stop-all.sh


 注意:此时默认用户名和密码都是